My husband and I have some strange hobbies. A new one we've picked up this year is using homemade cleaners. I'm not sure why we've adopted this, except perhaps we've grown tired of paying huge prices for laundry soap and bathroom cleaners.
Here is a recipe I chanced to come across at http://www.onegoodthingbyjillee.com website.
Powdered Dishwasher Detergent/Scouring Powder:
* 1 cup Washing soda
* 1 cup Borax
* 1/4 cup Kosher salt (reduces the effects of hard water)
* 1/4 cup citric acid (or
as an alternative you can use the same amount of Fruit Fresh or two
packets of Lemonade-Flavored Kool-Aid, ONLY lemon and ONLY unsweetened!)
You can also add a few drops of your favorite essential oil, if you'd like, but I don't do that. I'm afraid to leave oily spots in my dishwasher.
To use the detergent in your dishwasher, add 1 tablespoon of the powder to the soap dispenser and 3 drops of Dawn (or other dish soap) on top and close the lid. Add 1 cup of white vinegar to the bottom of the dishwasher.
You may have to experiment a little to see what combinations work for your dishwasher and for your water. We tried one load with 2 tablespoons of powder and the glasses came out spotty. But, with 1 tablespoon, they are sparkly. You can vary the amount of powder from 1 - 2 tablespoons and vary the vinegar from 1 - 2 cups to see what works best for you.
Give it a try and see what works for you!
Monday, February 27, 2012
Saturday, January 14, 2012
The JUNK Drawer
In the house of my childhood, there was such a thing as a "junk" drawer. It was always called a "junk" drawer though it actually had assigned contents. The things that belonged there were scissors, tape, string, and small hand-held household tools. But, the fact that it was called the "junk" drawer meant that anyone and everyone felt free to put pretty much anything else in there. Therefore, it always looked rather junky.
I swore that I'd never have a junk drawer at my house. Truth be known, there is no such drawer in my kitchen. Each drawer in the kitchen has an assigned purpose and assigned belongings. Yet, there are drawers in our sideboard in the dining room, and those drawers tend to fill the role that our old kitchen junk drawer filled. Today, those drawers are under attack!
 Here they are. The left one is full of miscellaneous things. And, oh, look... so is the right one. The right one has built in dividers. As I looked at these two drawers, I figured that those compartments could be assigned and that would help organize them.
 So, I took both drawers out and put them on the floor in my living room and sat done with the dear things. I first went through and took out anything that was trash or didn't belong in the room at all. I made two piles of those things. The trash was the biggest pile!
Then, I decided what ought to go in those compartments in the right drawer. I assigned one for gift wrapping supplies, one for office supplies and one for Steve's things. I suppose that's only fair since all the drawer space is otherwise mine! The compartment in the back has seldom used items.
Then I took a couple of sticky notes and made temporary labels for the compartments. It doesn't help to put things away if you don't know where they go. And, thus far, no one in this home can read my mind about where things should go. Here's a large picture so you can check it out.

 The other drawer received a less glamorous makeover. I already had the white tray and so I took out pens that didn't work and put pencils, pens and highlighters into the tray. Everything else is simply neatly arranged. I will need to get a few more trays. These drawers are quite shallow (about 2 inches deep) and when you open them quickly, everything goes sliding around. A few more trays will help corral the items.
In the end, the main thing about junk drawers, or any drawers for that matter, is that they need a little attention from time to time. It is well worth the little bit of time to cull the unwanted items, rearrange the things that you want, and enjoy a nice neat drawer until, well, until the next time they look like a mini-tornado went through them.
I swore that I'd never have a junk drawer at my house. Truth be known, there is no such drawer in my kitchen. Each drawer in the kitchen has an assigned purpose and assigned belongings. Yet, there are drawers in our sideboard in the dining room, and those drawers tend to fill the role that our old kitchen junk drawer filled. Today, those drawers are under attack!

 So, I took both drawers out and put them on the floor in my living room and sat done with the dear things. I first went through and took out anything that was trash or didn't belong in the room at all. I made two piles of those things. The trash was the biggest pile!
Then, I decided what ought to go in those compartments in the right drawer. I assigned one for gift wrapping supplies, one for office supplies and one for Steve's things. I suppose that's only fair since all the drawer space is otherwise mine! The compartment in the back has seldom used items.
Then I took a couple of sticky notes and made temporary labels for the compartments. It doesn't help to put things away if you don't know where they go. And, thus far, no one in this home can read my mind about where things should go. Here's a large picture so you can check it out.

 The other drawer received a less glamorous makeover. I already had the white tray and so I took out pens that didn't work and put pencils, pens and highlighters into the tray. Everything else is simply neatly arranged. I will need to get a few more trays. These drawers are quite shallow (about 2 inches deep) and when you open them quickly, everything goes sliding around. A few more trays will help corral the items.
In the end, the main thing about junk drawers, or any drawers for that matter, is that they need a little attention from time to time. It is well worth the little bit of time to cull the unwanted items, rearrange the things that you want, and enjoy a nice neat drawer until, well, until the next time they look like a mini-tornado went through them.
Thursday, December 29, 2011
Facing the post-holiday clutter
The holidays are over. What a rush of concerts, programs, shopping, eating, celebrating, loving and living! I can hardly believe that I haven't even thought about writing a blog entry during all of this hubbub.
But now...oh, but now... the post-holiday clutter has come to my home. As I sit happily drinking coffee (from my brand new Keurig coffee maker! Thank you, wonderful husband and children!) at my dining room table, I can see across the dining room, into the living room and just to my left, into the kitchen.
I'm happy to say that my kitchen survived the holidays the best. I can still see cleaned off counters, and since I already have done up the breakfast dishes, I could easily spend the rest of my day in my kitchen where it is peace and calm.
BUT, oh no! (Or, as my dear son would say, oh noes! Multiple. Plural.) The gift wrapping clutter still exists in the dining room. The holiday gifts are still lingering in the living room. Not a single decoration has been packed away yet. Signs of children home from school and college exist everywhere.
Now, I do not wish to rush Christmas away, nor do I wish to hide the fact that my sons still live here. But, the time has come to face the clutter. Today is the day. Here I go!
Wednesday, November 23, 2011
Facing the kitchen clutter
A number of weeks ago, I faced my kitchen clutter head-on. My kitchen is small, so I have always felt like I've had an excuse for why the counters get so cluttered. If I had a larger kitchen, I reasoned, then I would have a much easier time keeping them clear. This is faulty logic. Clutter is clutter, and it will follow me all the days of my life! I create clutter. My dear husband creates clutter. And, heaven knows that my children create clutter.
 Here is the view of my nearly unusable kitchen. You'll notice that there are clean dishes in the drainer, but the drainer is mammoth. There are two coffee makers on the counter. I guess my addiction is now known to all! Other things are piled there and, truth be told, everything is clean. But, it is impossible to work with NO counter space.
So, I got to work. There is no secret to dealing with the clutter. One must simply face it. My single biggest help is to get rid of things. As the FlyLady says, you can't organize clutter. You can only get rid of it. Give it away and let it bless someone else who truly needs it.
I began my work by putting everything away if it already had a home. If it didn't have a home, I tried to think about whether I really needed it. For example, I don't need two coffee pots. I am the only one who drinks coffee, and the Keurig works fine for me. I put my big coffee pot (which will be useful for holidays and parties) in storage in the basement. I moved my Keurig to a new "coffee center" under the window.
 I analyzed my need for my beautiful, large KitchenAid drainer. Yes, I do wash a lot of dishes by hand, but the drainer takes up about 25% of my total kitchen counterspace. I decided that I could live without the drainer. Though it broke my heart to do so, I gave it to our local resale store, The Depot. I already had a very nice Dish Drying Mat and I decided to use that instead of my big drainer. When I am not using it, I can fold it in half and tuck it under the sink.
As many things as I could put into the cabinets, I did so. There are a few things that I felt I needed to leave out. In my main cooking area, I left out my stand mixer and knife block. I use these nearly every day, and the stand mixer is a heavy bugger so it is difficult to put in and out of cabinets.
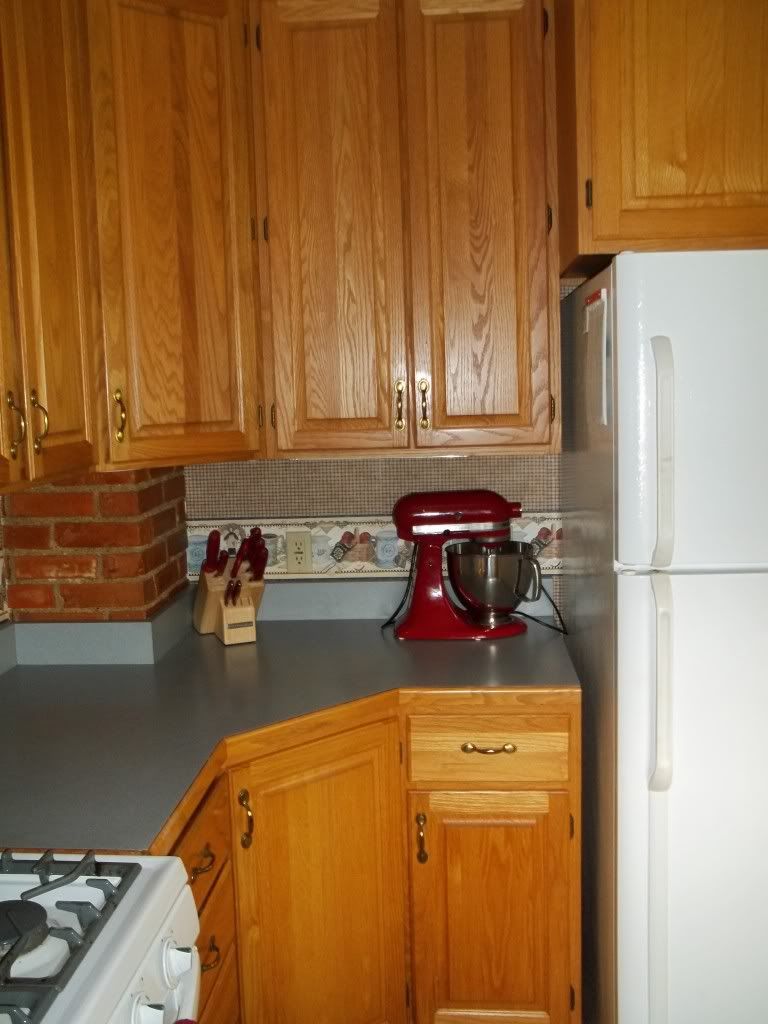 <-- This is my main cooking area. So, if I behave myself properly, these will be the only two things on this counter when I am not actually in the process of working in the kitchen! You can see that my work space is quite small. If I clutter it up with things, I'll always be frustrated about the space.
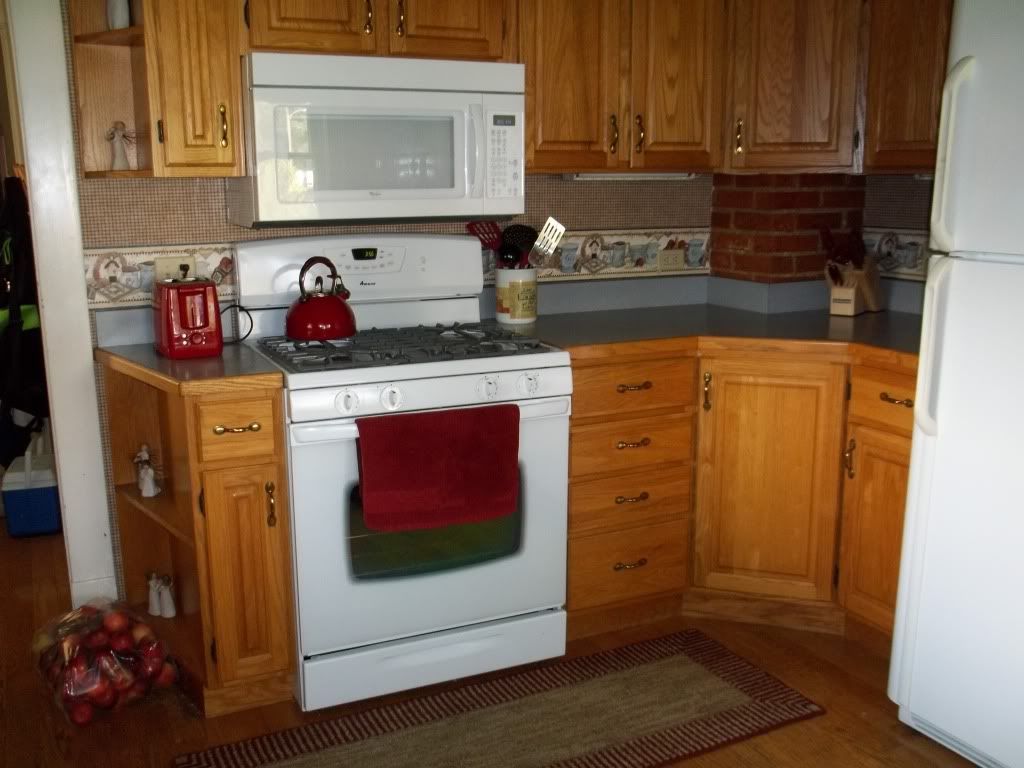 Here is a different view of the same --> area. (I have since turned the bag of apples into applesauce!) I put the toaster on the little slice of counter top space to keep the space from being a little "drop zone" for the family! So far, it has worked like a charm.
The counter that was completely covered has now become a usable workspace in my kitchen. Although I still am struggling with keeping the counters clear, at least now I have a plan and a vision of what it can be like to function in a kitchen with more usable counter-top space. For the not-so-organized, this is a gift. It is tremendous fun to cook and work in a tidy space.
I hope you find some inspiration for your kitchen. Enjoy your holiday festivities, and celebrate the heart of the home -- your kitchen and your love for your family. Happy Thanksgiving!


So, I got to work. There is no secret to dealing with the clutter. One must simply face it. My single biggest help is to get rid of things. As the FlyLady says, you can't organize clutter. You can only get rid of it. Give it away and let it bless someone else who truly needs it.
I began my work by putting everything away if it already had a home. If it didn't have a home, I tried to think about whether I really needed it. For example, I don't need two coffee pots. I am the only one who drinks coffee, and the Keurig works fine for me. I put my big coffee pot (which will be useful for holidays and parties) in storage in the basement. I moved my Keurig to a new "coffee center" under the window.
As many things as I could put into the cabinets, I did so. There are a few things that I felt I needed to leave out. In my main cooking area, I left out my stand mixer and knife block. I use these nearly every day, and the stand mixer is a heavy bugger so it is difficult to put in and out of cabinets.
Here is a different view of the same --> area. (I have since turned the bag of apples into applesauce!) I put the toaster on the little slice of counter top space to keep the space from being a little "drop zone" for the family! So far, it has worked like a charm.The counter that was completely covered has now become a usable workspace in my kitchen. Although I still am struggling with keeping the counters clear, at least now I have a plan and a vision of what it can be like to function in a kitchen with more usable counter-top space. For the not-so-organized, this is a gift. It is tremendous fun to cook and work in a tidy space.
I hope you find some inspiration for your kitchen. Enjoy your holiday festivities, and celebrate the heart of the home -- your kitchen and your love for your family. Happy Thanksgiving!

Saturday, November 19, 2011
Having an Organized Thanksgiving
I love to host Thanksgiving! I love preparing the meal and anticipating everyone coming to my home. I love the way my home smells and feels when the big day arrives. I love greeting people and making them as comfortable as possible.
But.... getting organized for the event is sometimes a little nerve-wracking. To ease my mind and give me focus, I make lists to help me keep things under control. If I just jump into the work without thinking things through, I'll spin my wheels and not accomplish as much. A list keeps me on-task and doing the most productive work that I can.
Saturday before Thanksgiving: By this time, I have my turkey in the freezer and my pantry stocked with all the staples that I need. I will have some other shopping to do, but it should be minimal. Today I need to do these things:
Wednesday:
Happy Thanksgiving to all!
But.... getting organized for the event is sometimes a little nerve-wracking. To ease my mind and give me focus, I make lists to help me keep things under control. If I just jump into the work without thinking things through, I'll spin my wheels and not accomplish as much. A list keeps me on-task and doing the most productive work that I can.
Saturday before Thanksgiving: By this time, I have my turkey in the freezer and my pantry stocked with all the staples that I need. I will have some other shopping to do, but it should be minimal. Today I need to do these things:
- Clean out the frig to make room for all the goodies to come!
- Make a shopping list for the last minute items and do the shopping.
- Fresh cranberries
- Orange juice (Orange Cranberry Sauce -- yum!)
- Sweet potatoes
- Russet potatoes
- Onions
- Green beans
- (Double-check ingredients for pumpkin pie -- Done!)
- Celery and parsley for the stuffing
- Wondra flour for the gravy (check!)
- Coffee for adults; milk for the children.
- Put things away on the main floor -- this is a general "declutter" activity. As you probably imagine, we fight the clutter ALL the time. It will take about 20 minutes (just a guess) to pick things up and put them away.
- Dust and vacuum.
- Clean the kitty box.
- Plan out the serving dishes for the big day. Write the food item that goes in each piece on a post-it or 3x5 card and place it in the dish. Stack the bowls in a corner of the china cabinet or inside a kitchen cabinet so they are all in one place. Then, when all your helpful guests come, they will know exactly what food goes in which bowl.
- Finalize the guest list. Plan seating. One year I made little seating cards to go on each plate. It was easier for everyone when it was time to come to the table. If I feel especially energetic, I might put "conversation starters" on the backs of the name cards. I did that one year, and it was so much fun! I heard some wonderful family stories I'd never heard. Conversation Starters
- Set the table. This can be done several days ahead unless you need your table for regular meals, of course. Set the table and then cover it with another tablecloth or sheet to keep the dust off of your table setting.
- Thaw the turkey! There are two methods for thawing the turkey -- the refrigerator method and the cold bath method. I usually use the cold bath method because it takes less time and it doesn't tie up the refrigerator for several days. Check the label on your turkey or read on the internet on how to thaw a turkey. Be careful! The time it takes depends on the size of your turkey. Here's a website to tell you how long: Tips for thawing and roasting
Wednesday:
- Bake the pies.
- Bake the banana bread (see Favorite Family Recipes). I keep frozen bananas in the freezer, so I always have some on hand to make banana bread. My kids are crazy for it!
- Chop up all the vegetables for stuffing, side dishes, etc. Put in ziplock baggies or small plastic containers and refrigerate. (This way, the only vegetable prep that needs to be done on Thursday is the potatoes.)
- Plan what time the turkey needs to go into the oven. I have a 21-pound turkey and we plan to eat at 1:30. The turkey will need to come out of the oven around 12:30 (because it needs to rest for an hour before serving). My turkey will need to roast for about 4 hours, so I need to put it in at 8:30 a.m.. It takes longer if you stuff the turkey, but I usually just fill the cavity with a quartered onion, a quartered apple, a carrot cut in half and a stalk of celery cut in half. I also add some thyme and sage for flavor.
- Just before bed, clean the kitty box again.
- Don't stay up late on Wednesday. It is more fun to have Thanksgiving when well rested!
Happy Thanksgiving to all!
Sunday, November 13, 2011
Finding oneself in an overly busy week
It's been a week since I last posted and as I mused on this fact, I realized that my week was unusually busy. Some of my time was spent simply catching up on required tasks at work and at home. But, some of it was also related to conquering chaos. Here are a few tips for the not-so-naturally organized when there isn't enough time to conquer an entire room at once.
Now, go do one thing!
- Just one thing. When I don't have time to do much at all, I tell myself to just do one thing. So, for example, if I don't have time to clean the whole bathroom, I might just wipe out the sinks. Or, I might just wipe down the mirrors. In order to do this, I keep the required supplies under the sink so that I don't have to go hunting down the cleaning supplies. If I do that, I might get side-tracked and never get back to my one thing!
- Maintain status quo. If I can't make progress in one area, at least I will not backslide in another. Yesterday, I would have loved to start on my craft room. But, I had some other daily tasks to attend to -- most importantly, it was bill-paying day. If I stop paying attention to those things that I already have in order, guess what happens? Chaos ensues!
- Multi-task wisely. For the not-so-naturally organized, multi-tasking can be a recipe for disaster. I am learning to avoid this disaster by choosing carefully what things I will work on at the same time. The tasks need to complement each other by using different skills and mental capacities. As I said, yesterday was bill-paying day. That is a big mental task. If I try to do another mental task at the same time, I'm doomed. But, I was able to start a batch of pizza dough and let my stand mixer (using the dough hook) knead the bread. Then, I let it rise, punched it down and got it ready to take to my daughter's for dinner. While cooking is somewhat of a mental task, it is not nearly as mentally draining as dealing with finances. The task was more physical. Combining a physical task and a mental task make it easier to multi-task.
Take a few moments to think about the pairings of things you might do. It's best for me if I keep it to two things. Otherwise, I can't make progress and I get totally confused about what to do next!
- Plan your garden for next spring -- match socks.
- Help a child with homework -- switch loads of laundry.
- Review your retirement allocations -- dust the tops of the ceiling fans.
Now, go do one thing!
Saturday, November 5, 2011
Facing the dumping zone
My house is filled with dumping zones -- places where people conveniently drop things when they come into the house. It seems that every room has some kind of drop spot. This is not-so-organized behavior.
 Today, I am facing one of those rooms -- our music/office room. Right now it is filled with clutter! I'm going to tackle it and make it the lovely, usable room that it ought to be... instead of the room with the closed doors and fear of something escaping from it!
My to-do list:
1) Make a plan -- there's nothing quite so aggravating as getting into a project and then realizing that you don't know where you're going with it! And, that is par for the course for the not-so-organized! I have thought through where the major pieces of furniture will go and what will be stored in them.
2) Take action -- here's my steps for the day:
 We lucked out and found two bookcases (with cabinets on the bottom) that matched our current bookcase. Ours was a little smaller, but we just put it in the middle to make it symmetrical. It worked like a charm. We purchased the bookcases at our local re-sale shop for a fraction of their original price. Here is a glimpse of the end result. (Note: my dear husband secured the cabinets together and also secured them to the wall. They won't fall over unless the house falls down!)

For the not-so-organized, this was a big day. I'm imagining that I'll have more projects that have to do with keeping this room humming along nicely. Thanks for joining me. Good luck with your spare room project! Let me know how it goes for you!

My to-do list:
1) Make a plan -- there's nothing quite so aggravating as getting into a project and then realizing that you don't know where you're going with it! And, that is par for the course for the not-so-organized! I have thought through where the major pieces of furniture will go and what will be stored in them.
2) Take action -- here's my steps for the day:
- Take out the trash! Grab a grocery sack, or a kitchen garbage bag, or even a bigger one if you need to, and start tossing the things that you know need to get OUT of the room right now! I'm going to focus on the floor and the horizontal surfaces.
- Move the small things out of the way. For me, that means hauling them into the next room, which happens to be my living room. I'm prepared for the reality of this -- my living room is going to be a disaster for a few hours! It's OK.... there is a higher purpose. Just don't leave it there overnight, or it might put down roots!!
- Move the big furniture into place.
- Replace the things you want to have in there. Everything should go to a) Goodwill or other charity, b) the trash, or c) the room where it actually belongs. I will be taking some of my music things to school, and that will clear some space.
 We lucked out and found two bookcases (with cabinets on the bottom) that matched our current bookcase. Ours was a little smaller, but we just put it in the middle to make it symmetrical. It worked like a charm. We purchased the bookcases at our local re-sale shop for a fraction of their original price. Here is a glimpse of the end result. (Note: my dear husband secured the cabinets together and also secured them to the wall. They won't fall over unless the house falls down!)
For the not-so-organized, this was a big day. I'm imagining that I'll have more projects that have to do with keeping this room humming along nicely. Thanks for joining me. Good luck with your spare room project! Let me know how it goes for you!
Subscribe to:
Posts (Atom)